If you no longer want to be the part of well known Social Networking Site Facebook, then you always have a freedom to disable you account and its simple also.
Just follow the steps given below to find out how to disable your used ID in Facebook!
First of all, go for www.facebook.com from any Internet Browser (no matter whether you are using Internet Explorer, Mozilla Firefox, Opera and Google Chrome or anything else).
Log-in to your Facebook account using your Facebook User ID and password.
Now, on the top right side of the site you can see the menu saying” Account”. (Yes you guessed it well, it’s the same menu in which you always select “logout” to say bye-bye to Facebook).
Click on the “Account Settings”, which is the 2nd option in the menu.
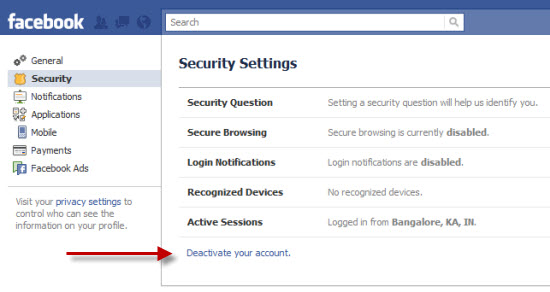
Now, on you left side, you will see a task pane listing some more options like General, Security, and Notification etc. Here, we are concerned with the option “Security” only.
As soon as you click on “Security”, your browser will show you “Security Settings” Window.
In its bottom, you will see an option, or rather link, which is underlined and written in blue, and says “Deactivate your account”. This is your destination.
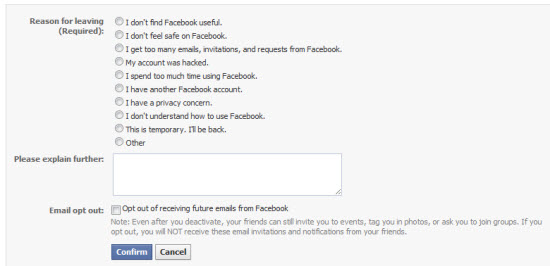
Just click on this account and you will come to your friend details. You may send messages to them at this stage. This page will ask you to specify the reason stating why you actually wish to leave Facebook with some explanation. Checking any of the specified reasons will give you some tips to satisfy you. But you have to give at least one reason. You may also check the box stating “Opt out of receiving future emails from Facebook” if you don’t wish to receive any more emails from Facebook. Also, you may check to close the groups created by you.
Now, click on “Confirm” button and again you will be asked to input your existing password.
Click on “Deactivate Now” after inputting your password. It will ask you to type some creepy words, the same you typed at the time of creating the account and click submit.
You will now see the login screen of Facebook again flashing the message “Your account has been deactivated “
If you wish to join again, Facebook allows you to do so by just entering your email ID and password as you used to do to take log in. You will be able to use the site like you used to.
If the Facebook has disabled your Profile, then you may have to put a little more efforts to recover your account.
Firstly, you have to log in with your correct password, and then you would see a message telling you that your account is disabled with a link to a page in Facebook’s Help Center. It already happened before also, when Facebook itself disabled some people’s accounts, and asked them send in a copy of their real-world ID.
If this is the case then you have to fill up the form given in http://www.facebook.com/help/contact.php?show_form=disabled to reactivate your account.

